

|
This is a hands-on tutorial. You download a small SQL DBMS from the web (for free), then follow the illustrated exercises. You need a Windows computer, and one hour. It's not fun -- life is serious! -- but it's easy and you learn a useful skill. I believe that the goal of a tutorial should be to give you a clear idea of all that CAN be done. Details can be looked up. |
| Please read this copyright notice first: | |

|
Copyright © 2001 by Peter Gulutzan
|
|
Copyright violation is illegal and despicable. |
|
|
Download and install an SQL DBMS |
10 minutes |

|
Make sure you have all the following: a browser such as Internet Explorer or Netscape, a "Microsoft Windows" operating system (Windows 95/98/Me/NT), an internet connection, and 20MB free space on your disk drive. You can skip the download if you don't have Windows and disk space and a browser, but that would be a shame. It's much better to learn by doing. By way of reassurance: thousands of people have done this download before you, there will be no changes to your system settings, and I'll show you how to do a "100% uninstall" when you finish the tutorial. |
|
>> Start up a second copy of your browser. That way you will be able to continue reading this page, while you download. >> Load this internet web page (use cut and paste to copy the URL): |
| http://www.ocelot.ca/download.htm |
|
|
|
|
>> Wait. The size of the file that you're downloading, "ocelot.exe", is about 4 megabytes. This is a tiny file considering it contains a complete DBMS, but it's on a slow server. While you're waiting, now is the time to soak up some background material. Memorize these words: | |
|
|
TABLE. For example, a database can contain an Employees table. |
|
|
ROW. For example, an Employees table can have one row for each employee.
|
|
|
COLUMN. For example, an Employees table can have a column for employee names. |
|
It's okay to pronounce "SQL" as either "ES-KYU-EL" or "sequel". It's gauche to say "Structured Query Language", though. Nobody says "Beginners All Purpose Instruction Code" when they mean BASIC, or "North Atlantic Treaty Organization" when they mean NATO. The abbreviation is enough. |
|

|
The major SQL vendors (Oracle Microsoft IBM and others) peddle their own dialects of the language, but think. When you took a foreign language in school, did you start by learning a regional dialect? No, you studied the standard speech. Fine, so when you learn SQL, start with standard SQL. Standard SQL comes from ISO internationally, or ANSI in the United States. Since the latest standard version came in 1999, correct possible terms are SQL:1999, SQL/99, SQL99, or the one I prefer, SQL-99. The older version (SQL-92) is no longer an official standard, but some current SQL implementations only support a subset of SQL-92. The DBMS you are downloading now is THE OCELOT SQL DBMS, which contains all of SQL-92, all the SQL-99 you'll need, and absolutely no deviations or extensions. I want to emphasize that! There is no such thing as an "Ocelot SQL" dialect. You are going to learn standard SQL. |
|
Okay, by now the download should be done. If you took my advice and started a second instance of your browser, you can close it now. You won't be needing anything else off the internet while you use this tutorial. |
|
|
|
>> Run (i.e. click Start+Run on your Windows taskbar):
|
|
|
>> Run:
|
| setup |
|
| setup |
|
| setup |
|
| setup |
|
| setup |
|
| setup |
|
| setup |
|
| setup |
|
|
You have now finished the download and installation of an SQL DBMS. |
|
|
Get Acquainted With A Database "Front End" |
10 minutes |
|
|
I recommend that you keep two separate windows open throughout this tutorial, one showing the text you're reading now, the other for the program that you're about to start and run. |
|
|
>> Run:
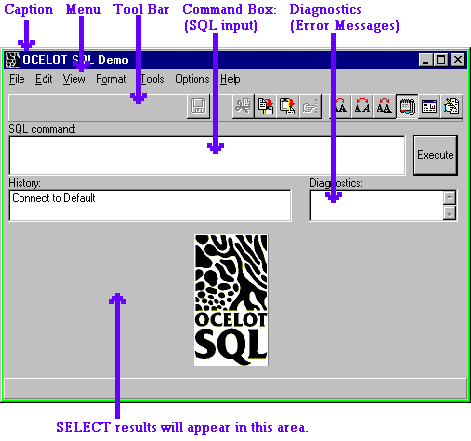
DEMO32 will take up the full screen. The picture below shows what it would look like slightly reduced. Take a moment to look at it. |
|
|
|
|
demo32
|
The "Menu" has items for saving what you type, for changing the font, and for getting help on many topics. |
|
demo32
|
The "SQL Command:" box is where you'll type in SQL statements. TIP: you can enter SQL statements by cutting from this window that you're reading now, and pasting to the screen input for demo32.exe, but only one statement at a time please. |
|
demo32
|
The "bottom of the screen" is where you'll see results. When you retrieve data, you'll see rows and columns in this area. |
Entering SQL StatementsNow it is time to enter an SQL statement. An SQL statement looks like an English imperative sentence. The parts of a statement are:
It's time for your first exercise. I will introduce all exercises with the words ">> Enter an SQL statement:" and you must type the statement that follows, as far as the semicolon, exactly as shown. >> Enter an SQL statement:CONNECT TO 'OCELOT'; Make sure that your input is going in the box labelled "SQL Command:". 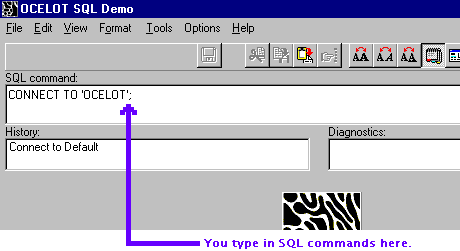
When you finish typing, click the Enter key or the Execute button or the menu shortcut Ctrl-E. You will see the word OK appear in the diagnostic box. The program also removes the words "CONNECT TO 'ocelot';" from the SQL Command: and puts them in the History box. The SQL Command: box will clear. 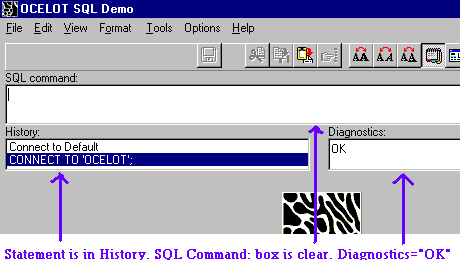
All these things happen when an SQL statement succeeds, so this means you have successfully connected to the sample database. If you would prefer to enter statements by reading files rather than typing or pasting them -- something I don't recommend -- you can click here for a look at script files. You won't be needing demo32.exe's advanced features, so this "get acquainted with the front end" section is at an end. In the next section, you can start getting acquainted with SQL itself. |
|
|
Make And Manipulate A Small Table |
10 minutes |
|
Manipulate
|
You'll create a table with two columns, then insert two rows, then retrieve what you inserted, then update it, then destroy it. This is necessary. You must have some idea how databases are manipulated, before you can work on queries. | ||||||
create table

|
Create A Table With Two Columns
>> Enter an SQL statement:
|
||||||
insert

|
Insert Two rows
>> Enter an SQL statement:
You just put two rows in the Books table. You used a character literal for the first column because the title has data type = CHAR(10). You used a number literal for the second column because the quantity has data type = INTEGER. |
||||||
Select and display |
|||||||
| select |
>> Enter an SQL statement:
The result area of the demo32 window fills up with a display of the table. 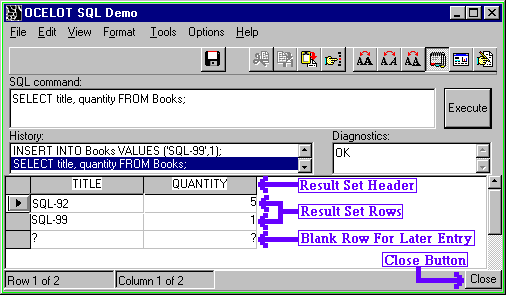
A SELECT's result is called a "result set". This result set has two rows, in two columns named title title and quantity. So you got out what you put in. |
||||||
|
|
>> Click the Close Button on the bottom right of the display. (The Close Button will appear whenever there is a result set on display. You will have to click it before you can continue. I will not repeat this instruction every time I say "Enter an SQL Statement", I assume you will remember to click "Close" when you finish looking at results.) |
||||||
Select certain rows
>> Enter an SQL statement:
|
|||||||
|
demo32
|
|
||||||

|
Observe what the words "WHERE quantity > 3" have caused. The row in the display is the row where the equation (value in quantity column greater than 3) is TRUE. The symbol > means greater than. Other symbols are: = equals, >= greater than or equal, < less than, <= less than or equal, and <> not equal. Notice that last item: <> is the way to say not equal. If you're used to using != as in C, you must evolve. | ||||||

|
Commit>> Put your ear beside your computer's hard drive.
>> Enter an SQL statement:
Hear that clunk? When you COMMIT, you are writing to disk. Before you COMMIT, all the changes you made to the database (the CREATE and INSERT statements) are tentative, you could have changed your mind. There is an optional switch to make commits happen automatically for every data change, but the switch is usually OFF in this DBMS. |
||||||

|
Update
>> Enter an SQL statement:
This is how you change a row that already exists. You are selecting a row, but the selection won't come back to you. The UPDATE statement takes the result set and changes the values. The diagnostic box will say "OK, 1 rows updated". Now let's SELECT again:
>> Enter an SQL statement:
|
||||||
|
demo32
|
|
||||||
|
You'll see that there are no 5s in the table now, only 1s. |
|||||||

|
Rollback
>> Enter an SQL statement:
ROLLBACK is the reverse of COMMIT. Instead of making the recent change permanent, you are cancelling it.
>> Enter an SQL statement:
|
||||||
|
demo32
|
|
||||||
|
See the difference: the table is now back to where it was before the UPDATE. But the rows are still there. The ROLLBACK can only affect changes done since the last COMMIT. | |||||||

|
DestroyNow you'll destroy the rows in the table and the table itself. This cleanup will make it possible to re-run the exercises another time.
>> Enter an SQL statement:
The DELETE statement eliminates all rows in the table. You could be selective by using a WHERE clause, but you want them all gone.
>> Enter an SQL statement:
DELETE only removes rows. DROP TABLE ... CASCADE destroys the table itself. That is, it reverses the CREATE statement.
>> Enter an SQL statement:
You have to commit destructions just as you had to commit creations. Now the table that you created is gone irrevocably. In the next exercises you'll begin with a clean slate. |
|
|
Query A Pre-Existing Large Table |
10 minutes |

|
SELECT From The Predefined Sample TablesIt's time to do some SELECT exercises with larger tables, but it would be tedious to do hundreds of CREATE and INSERT statements first. So you will use some already-existing sample tables. Ocelot created and filled three tables for you: EMPS (500 rows), DEPT (52 rows), and SDEPT (3 rows). You will start with some simple SELECTs just to see what the tables look like, and will progressively do more and more complex SELECTs. |
||||||||||||||||||||||||||||
The Emps table
>> Enter an SQL statement:
Get familiar with the Emps table by scrolling vertically (up and down the rows) or horizontally (forward and backward the columns), before you close the result set. |
|||||||||||||||||||||||||||||
|
demo32
|
AND, OR, NOT
>> Enter an SQL statement:
|
||||||||||||||||||||||||||||
|
The idea here is that you can combine various search conditions using AND / OR, with parentheses. I don't like to say AND NOT SURNAME = 'JONES' I prefer to say AND SURNAME <> 'JONES'. |
|||||||||||||||||||||||||||||
|
|
ORDERThe keywords ORDER BY, then one or more column names, cause sorting.
>> Enter an SQL statement:
|
||||||||||||||||||||||||||||
|
demo32
|
|
||||||||||||||||||||||||||||
|
You sorted first by surname, then within that (where the surname values are equal) by empnum. The word DESC stands for "DESCENDING", that's why ABEL-189 precedes ABEL-184. |
|||||||||||||||||||||||||||||

|
NumbersSQL allows three "approximate numeric" data types (example: FLOAT), and four "exact numeric" data types (examples: INTEGER and DECIMAL). The deduction and rate columns were created with DECIMAL(6,2), that is, they are 6-digit numbers but they have two positions after the decimal point.
>> Enter an SQL statement:
| ||||||||||||||||||||||||||||
|
demo32
|
|
||||||||||||||||||||||||||||
|
To do arithmetic, combine column names, literals, parentheses if necessary, and the arithmetic operators + / - *. |
|||||||||||||||||||||||||||||

|
CharactersSQL allows one fixed-length character data type (CHAR), one variable-length character data type (VARCHAR), and one long-variable-length character data type (CLOB). Alternate names are CHARACTER, CHARACTER VARYING, and CHARACTER LARGE OBJECT. Several Emps columns are either CHAR or VARCHAR.
>> Enter an SQL statement:
"Take a substring of gname starting at position 1 for length 1 (that is, take the first character of gname). Concatenate -- double bar || is the symbol for concatenate -- a character literal '$'. Concate surname after converting it to lower case. Convert empnum, which is an INTEGER, into a VARCHAR, and concatenate that too." |
||||||||||||||||||||||||||||
|
demo32
|
|
||||||||||||||||||||||||||||
|
>> Enter an SQL statement:
| |||||||||||||||||||||||||||||
|
demo32
|
|
||||||||||||||||||||||||||||
|
|
|||||||||||||||||||||||||||||

|
Dates
>> Enter an SQL statement:
|
||||||||||||||||||||||||||||
|
demo32
|
|
||||||||||||||||||||||||||||
|
You will see a different value for the first expression because you are reading this on a later "current date". The cumbersome-looking format for a date literal -- DATE 'yyyy-mm-dd' -- is mandatory. DATE and INTERVAL are separate data types. |
|||||||||||||||||||||||||||||

|
Times
>> Enter an SQL statement:
|
||||||||||||||||||||||||||||
|
demo32
|
|
||||||||||||||||||||||||||||
|
A time literal has the form TIME 'hh:mm:ss' and a time INTERVAL literal has the form INTERVAL 'n' HOUR or INTERVAL 'n' MINUTE or INTERVAL 'n' SECOND. Most arithmetic is a matter of adding or subtracting intervals from times. |
|||||||||||||||||||||||||||||
|
demo32
|
Set Functions
>> Enter an SQL statement:
|
||||||||||||||||||||||||||||
|
demo32
|
GROUP BY
>> Enter an SQL statement:
|
||||||||||||||||||||||||||||

|
Subqueries
>> Enter an SQL statement:
|
||||||||||||||||||||||||||||
|
demo32
|
|
||||||||||||||||||||||||||||
|
Here I have a SELECT within a SELECT. In concept, the inner SELECT happens first and returns some dept values in the Emps table. Then the outer SELECT finds those values in the Dept table which have a value that matches any of the Emps results. The question could be phrased as: "who is the manager of the department that WALSH is in?". | |||||||||||||||||||||||||||||

|
JoinSQL is famous for the way you can join two tables and get columns from both. There are two slightly different syntaxes, one classic, one new.
>> Enter an SQL statement in the classic style:
|
||||||||||||||||||||||||||||
|
demo32
|
|
||||||||||||||||||||||||||||
|
This is a join of two tables. Notice that the row that results has columns from both Dept and Emps. The WHERE clause is establishing this criterion: "combine the rows where the department, identified by dept, is the same the department that WALSH is in". The result is the same as in the previous exercise, but now you can get columns from both tables (with a subquery you can only get columns from the outermost SELECT). On the other hand, it looks more complex than the subquery example. Also, you had to use a new way to identify the dept column: since both tables have a column with this same name, you had to resolve the ambiguity by putting the table name first, then a period, then the column name, as in "Dept.dept" or "Emps.dept". This is called qualification. That's the classic join syntax.
>> Enter an SQL statement in the new style:
| |||||||||||||||||||||||||||||
|
demo32
|
|
||||||||||||||||||||||||||||
|
That's the new join syntax. It gives the same results as the classic syntax. |
|||||||||||||||||||||||||||||
|
|
Set TheoryTables are sets. In set theory, sets can interfere with each other in three classic ways:
|
||||||||||||||||||||||||||||
Access information_schema
>> Enter an SQL statement:
|
|||||||||||||||||||||||||||||
|
You'll see a whole bunch of rows come out. Where did they come from? Answer: the DBMS always maintains a "table of the tables" or "meta-table". There are quite a few tables in the list, you can SELECT from any of them. It's a hallmark of a real DBMS that it contains a database of itself. With standard SQL, such metadata is always in information_schema. (A schema is a grouping of objects such as tables and columns.) |
|||||||||||||||||||||||||||||
Constraints |
|||||||||||||||||||||||||||||
|
|
I don't want to deal in this tutorial with "database administration" features that might not affect you directly. I will, though, touch on the subject of constraints. You might not make these yourself, but they affect you, and they're an important part of the SQL idea, so let's see what's up with constraints.
The following SQL statements define the sample OCELOT database:
>> Enter an SQL statement:
The DEPT_PKEY constraint says that the dept column is a primary key. One of the two big features of a primary key is: it can't be duplicated. And there is a dept which has dept = 'A'. So there.
>> Enter an SQL statement:
You should appreciate these constraints. They ensure that your database will be harder to ruin with bad or inconsistent data. |
|
|
Program |
10 minutes |
|
|
Traditionally, people have written programs in another language (like C or
Pascal or Java) and called SQL routines from there. I just want to
illustrate what such programs look like, without having to explain every
detail of the SQL Call Level Interface (SQL/CLI and its variant, ODBC).
So I'll just dump a sample C program here. If you understand some of it,
fine. If not, skip to the next section.
I encourage you to look for all the files with a .c or .java or .pas extension on c:\ocelot. The Pascal example will especially awe you, since the code of demo32.exe -- the front end that you've been using -- is all there as Delphi source. |
|
|
Configure A Client/Server Network |
10 minutes |

|
For the network exercises you need to run a SERVER and two CLIENTs. So that the setup is less tricky, you'll run them all on the same computer. First you'll exit from the current "standalone mode" demo32.exe. Then you'll run setup.exe again and this time specify that you want "client/server mode". Then you'll start up demo32.exe (the first client). Then you'll start up demo32.exe again (the second client). I will show how the clients can affect each other, but the server will resolve the problems. Since the Latin word for "run together" is concurrere, and you'll have two clients running together, I call these problems "concurrency problems". The server resolves concurrency problems using Isolation Modes.
>> Enter an SQL statement:
>> Enter an SQL statement:
Now it's time to get out of DEMO32.EXE. Do that by choosing File | Exit on the menu bar or by hitting the little "X" box on the top right of the window. |
| setup again |
Run c:\ocelot\setup.exe. This should be easy: you ran setup.exe before. You will see the same screens as before, and will click the same buttons. But there will be two differences.
|
| server32 |
When you finish running setup.exe, start the server.
This is just a monitoring window. |
|
|
Now it's time to bring up the first client.
>> Run c:\ocelot\demo32.exe Now bring up the second client.>> Run c:\ocelot\demo32.exe The exercises will be easier if all the windows are visible, so reduce the size of each demo32.exe window and move the server window out of the way. When you're done, your Windows desktop should look about like this: |

|
Let's say the demo32.exe window on the left is "client 1" and the demo32.exe window on the right is "client 2". The essential thing in the following exercise is to execute each SQL command IN ORDER. Thus, after entering "CONNECT TO 'OCELOT';" on the client 1 window, use the mouse to switch to the client 2 window and enter "CONNECT TO 'OCELOT';" on the client 2 window, then use the mouse to switch back to client 1, and so on.
Do not be alarmed when client 2 hangs in step 4! Client 2 is waiting for client 1 to finish. When you switch to the client 1 window and enter "ROLLBACK;" you are ending the transaction. Transactions end with either COMMIT or ROLLBACK. You can get rid of that hang by reducing the isolation level. The SERIALIZABLE isolation level -- what you've just experienced -- is the default because it's absolutely secure. However, there are several optional isolation levels which allow more concurrency. That is, they reduce the hangs by increasing the security risk. You will experiment with just one of these lower isolation levels.
No doubt you observed the error message in step 5: [OCELOT][SERVER]CLI specific: Locked. This should only occur if (a) system is in multi-user mode (b) transaction type = READ COMMITTED or REPEATABLE READ (c) attempt to change what another job has read, or attempt to read what another job has changed . At the REPEATABLE READ isolation level, simultaneous SELECTs are okay but there is a prohibition on updating a row that another job is reading, or vice versa. At lower isolation levels, even that prohibition is lifted.
Now close both copies of demo32.exe, and close server32.exe (in all cases
this is possibly by merely clicking the
|
|
|
Sample An ODBC Application |
10 minutes |
For this last exercise, run c:\ocelot\setup.exe once more. This time,
specify these two things differently:
|
|

|
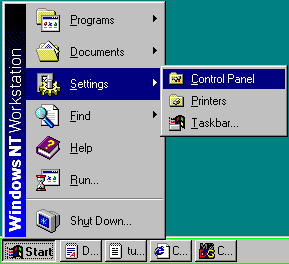 Now you must run the "ODBC Administrator" program. You might be able to
use Find (look for a program named ODBCAD32.EXE). Here I'm assuming you
can press Start on the Windows task bar, then Settings, then Control
Panel.
|
| odbc |
|
| odbc |
|
| odbc |
|
| odbc |
|
| odbc |
|
| odbc |
|
|
|
>> Run:
|
| odbc |
|
| odbc |
|
| odbc |
|
| odbc |
|
| odbc |
Now maximize the "Query1" client window (by clicking the Maximize box which is on the "Query1" caption bar). You will see this display: 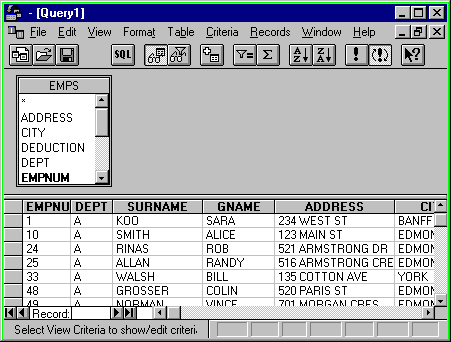
This has been a typical example of the use of an ODBC application (in this case Microsoft Query) to connect with an ODBC data source. The remarkable thing is that you told Microsoft Query nothing except the data source -- it figured out the table definition and contents by silently querying THE OCELOT SQL DBMS. Exit from Microsoft Query by clicking File|Exit on the main menu. If a dialog box appears asking "Save changes to Query1?", click No. |
|
|
Clean Up |
10 minutes |

|
And now to uninstall. There are two ways:
|
|
|
|

|
There is nothing left now. The programs and the sample databases are gone. If the install changed the registry, it has been restored. Your hour is now up. The SQL tutorial is over. |

|
|

|
Feel free to download THE OCELOT SQL DBMS again, any time.
You will find that it is all you need for practice, and for
most other purposes. The software is free; we do not provide
technical support.
And please tell your friends to browse Ocelot's site or link to this tutorial. |